OpenRA's API At a Glance
Now that we have a basic understanding of Lua, we can now dig into the OpenRA API for Lua. Much of the content in this page is derived from the OpenRA Lua Documentation and the OpenRA Traits Documentation, but should hopefully be easier to understand than that since we're going to approach this from a beginner's standpoint. With that, let's get started!
Chapters:
- OpenRA Extensions for VSCode
- WorldLoaded and Tick
- Players and Player Properties
- Actors and Actor Properties
- Triggers
- Sound Controls and Text Displays
- Production Controls and Queues
- Miscellaneous Information
OpenRA Extensions for VSCode
This is the part where we're going to get the OpenRA extensions for VSCode ready. If you're not using VSCode, you can skip this part.
First, we need to go back to the extensions page and install the OpenRA extensions. The process is similar to the one for the Lua extension:
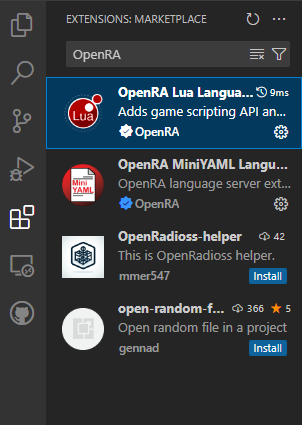
You can install both OpenRA Lua and OpenRA MiniYAML extensions, but we'll only need the Lua extension for this tutorial.
Next, we'll need to set up the extension inside our maps folder. The location of the maps folder varies based on your operating system and mod version. Here's a quick reference for your convenience:
- Windows:
C:\Users\(username)\AppData\Roaming\OpenRA\maps\(modname)\(version)\ - Linux:
/home/(username)/.config/OpenRA/maps/(modname)/(version)/ - Macintosh:
/Users/(username)/Library/Application Support/OpenRA/maps/(modname)/(version)/
(Note: You might have to disable your file manager's "Show Hidden Files" option to see the .config folder. See your file manager's documentation if you don't know what that means.)
Inside this folder, we need to create a folder called .vscode, which will be accessed by VSCode when we open the folder within the app. This is a simple step.
After that, we need to go into that folder and create two files, one called extensions.json and one called settings.json which we'll need to make VSCode work properly. While not strictly necessary, it will make our lives a lot easier when working with the API.
Now we need to add some stuff to both of these files, starting with the extensions file. This one is easy: We just need to add the extension(s) we just installed as recommendations to the app. The code below should be all you need:
                {

                "recommendations": [

                "openra.vscode-openra-lua",

                "sumneko.lua"

                ]

                }
The settings file is where things start to get tricky. This is where we actually make VSCode use the installed extensions as they're intended to be. This one takes a lot of trial and error, but this is how I did it the first time:
- First, we need to go to our extensions folder and find the OpenRA Lua extension itself. You hsould be able to find it under your Home folder -> .vscode -> extensions -> openra.vscode-openra-lua or something similar. Inside of here is an API file that we need to add to the settings file so it can find it.
- Second, we need to find some files related to map creation. This one should be under the same location where the OpenRA config folder is stored (you know, the
.config/OpenRAfolder from earlier). Find one the says Code on it, then navigate through it toUser -> worlspaceStorage -> 66196cd926e2a0e498df8316cbcb0939 (or some other number) -> openra.vscode-openra-lua -> map. If it's not there, you should be able to skip this step. - Now we can bring it all together. Copy the two directories we just found and put them into the
settings.jsonfile in a similar manner to the last file, but withLua.workspace.libraryreplacing therecommendationspart from before.
With any luck, you should have this in your settings file:
                {

                "Lua.workspace.library": [

                "(Directory of the extension api)"

                "(Directory of the extension map)"

                ]

                }
It might require a bit of tinkering, but after a while you should be able to autocomplete statements from VSCode and not have it yell at you all the time for not knowing what anything is. Again, this ins't strictly necessary, but it'll make our lives way easier.
With that done, we can finally move on to the API itself.
WorldLoaded and Tick
Let's start with the backbone of any OpenRA script: the WorldLoaded and Tick functions! These are what initializes the script and allows it to be read by the game when loading a new map. Their basic functionalities are:
- WorldLoaded: Runs this code as soon as the player enters into the game.It can call other functions to be initialized alongside it.
- Tick: Runs some code every tick (or frame) of game time. It can sometimes cause a map ot bog down or outright crash, so use caution when adding stuff to this.
As such, you will want to add this to your Lua script as soon as you create it:
                WorldLoaded = function()

                {


                }


                Tick = function()

                {


                }
If you've ever gotten to use the "New OpenRA Mission Script" thing that popped up with the OpenRA API (it doesn't anymore, which is sad), it would automatically add those functions for you. For now, we'll just add them on our own like normal heathens.
Players and Player Properties
Another essential to any OpenRA Script is making sure you can see and modify the players as your map calls for it. This is where the Players functionality comes into play. When you use it to get a player based on name, it generates a new Player class of that name that you can then modify and reference as you please.
To get a player, all you need is the name of that player and then use this code:
PlayerName = Player.GetPlayer("PlayerName")
You can then hover over it in VSCode and see various things about that player, with many different properties to tinker with to our heart's content:
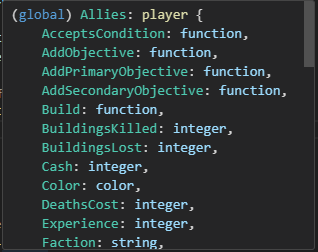
Here are just a few that you'll want to know:
- AddPrimaryObjective: Adds a primary objective to the player; used primarily on the human player.
Obj1 = PlayerName.AddPrimaryObjective("Destroy all enemy forces.") - AddSecondaryObjective: Adds a secondary objective to the player, similar to the above.
Obj2 = PlayerName.AddSecondaryObjective("Capture the hospital.") - Cash: How many credits the player has on hand. Can be changed at any time during the mission.
PlayerName.Cash = 8000 -
GetActors: Gets all of the actors (i.e. vehicles and buildings) whose owner is the specified player.
PlayerActors = PlayerName.GetActors()- GetActorsByType: Gets all actors on map whose type matches the type specified (more on that later).
PlayerActors = PlayerName.GetActorsByType("e1") - GetActorsByTypes: Gets all actors on map whose type matches any one of the types specified (again, more on that in a bit).
PlayerActors = PlayerName.GetActorsByTypes({"e1", "e2"})
- GetActorsByType: Gets all actors on map whose type matches the type specified (more on that later).
- HasNoRequiredUnits: A condition that's true if all combat units (i.e. tanks) and non-tech buildings are killed. Will always be false if there's at least one unit that meets the conditions still on the map.
if PlayerName.HasNoRequriedUnits() then [...] end - IsBot: Whether or not the player is a bot (duh).
if PlayerName.IsBot then [...] end - MarkCompletedObjective: Marks a stated objective as completed. Once all non-resolved primary objectives are marked as completed, the game ends in a success.
PlayerName.MarkCompletedObjective(Obj1) - MarkFailedObjective: Marks a stated objective as failed. If at least one primary objective is marked as failed, the game ends in a failure.
PlayerName.MarkFailedObjective(Obj2)
On the OpenRA Lua Doc, it specifies either a get or a set value for a given function/property as well as what's required for the function to work. The only real difference is that get means you can see the value of that function/variable and set means you can modify it. Pretty simple.
Actors and Actor Properties
Now it's time to get into the real nitty-gritty of any OpenRA Lua script: actors. Actors are any infantry, vehicle, ship, building, scripting item, or anything else that can be placed on a map and interacted with. You can both create and access actors present on the map within the script, and can even access actors present in the map.yaml file.
You can see all of the actors for a given mod by opening up the mod, going into the map editor and opening the "Actors" tab:
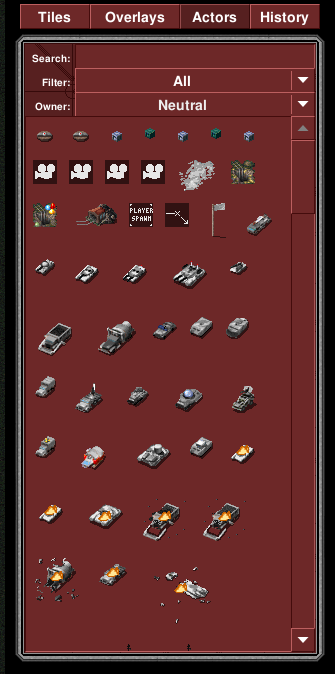
Every actor in a given mod has a name and an identifier. You can see what these are by hovering over the actor in the editor:
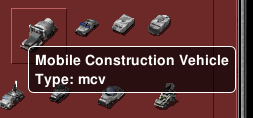
We'll use these identifiers a lot as we get into making our own actors, as this is what the game uses to spawn new actors in the script.
To make a new actor by itself, we can use the Actor.Create() function. It's only real functionality is to create a new actor of a specified type and with a set of initial properties. For example:
myTank = Actor.Create("1tnk", true, {Owner = Allies, Location = myLocation.Location})
In this case, we are taking a new tank of type 1tnk, adding it to the world (addToWorld = true) and specifying in a Lua table that its owner is the player (Allies) and that it's starting at a preexisting location (MyLocation.Location).
To spawn them as a reinforcement for a given player, we can use the Reinforcements function set, which has a few useful functions for spawning new scripted actors. We'll focus first on the Reinforce function, which takes a list of actor types and spawns those actors with a desired path of entrance. An example of this is:
mySquad = Reinforcements.Reinforce(Allies, {"e1", "e1", "e1", "1tnk"}, {ActorSpawn.Location, ActorDest.Location})
In this case, we're having a new reinforcement spawn containing three solders (e1) and a tank (1tnk) belinging to the Allies, with the spawn bring a predefined actor and its destination being another actor. The reinforcement will spawn on the spawn actor and go to the destination actor right after. Note that both of these are invisible actors meant for this very purpose, and also there can be other actors in between the spawn and the destination (what thre API calls the entryPath.
Speaking of, there are actors meant specifically for use in scripted maps. In the above, both of these actors are waypoints, which have the type waypoint and can only be seen in the map editor and, obviously, in out script. There are also cameras that can be used in our script that will allow the owner player to see around it, like this:
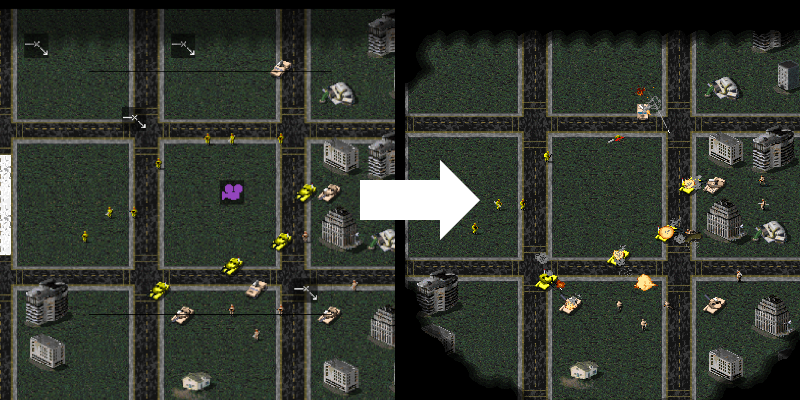
In this demo, the camera, which belings to the human player, shows a certain area to them (i.e. the battle that is shown). There are also waypoints shown that will spawn reinforcements belingong to the yellow player (an AI player) later on.
Every actor also has a specific location the essentially defines where they are. This is a good time to bring up CPos and WPos, which help define the positioning of actors and other things around the map. This is essentially the difference between the two:
- CPos: Short for "CellPosition," it defines the location of an actor or object based on cell positioning, which is defined by an X and Y coordinate. This is the positioning unit most used for actors.
- WPos: Short for "WorldPosition," it defines the location of an object based on world positioning, which is defined by an X, Y, and Z coordinate. This is less widely used and is usually used for the player camera.
If you want to define your own position for an actor, both CPos and WPos come with a function called New, which as the name suggests lets you define a new CPos or WPos coordinate and save it as a variable. For example:
actorPosition = CPos.New(32, 32)cameraPosition = WPos.New(56, 64, 0)
You can also use the map editor to determine positioning. Hover over something in the editor and look to the top of the screen. You'll see the coordinates of the cell you're hovering over next to the Overlays tab:

By using this to define our CPos and WPos coordinates, we can save ourselves some actors for other purposes. Just make sure you don't confuse a CPos/WPos with an actor when you're not paying attention...
There are a lot more to actors than just these, however. Here's just some of the functions/properties that you'll want to know when playing with them:
- Attack: Tells the actor to attack another actor. Requires that the actor being attacked is not cloaked, submerged, or otherwise invisible.
soldier.Attack(enemyFact)soldier.Attack(friendlyFact, true, true) - AttackMove: Tells the actor to move to a location, attacking anything that comes within its field of vision.
tank.AttackMove(spawnPoint.Location) - Capture: Tells the actor to capture a building. Requires that the actor can capture buildings (i.e. an engineer) and that the building can be captured.
engie.Capture(enemyFact) - Deploy: Tells the actor to deploy immediately (given that it can be deployed, i.e. an MCV).
mcv.Deploy() - Destroy: Removes the actor from the world without counting it as a death.
myActor.Destroy() - CenterPosition: The actor's location as a WPos.
Camera.Position = myCamera.CenterPosition - Health: The actor's current health.
actorHealth = myTank.Health - IsDead: Is this actor dead (i.e. blown up by another player)?
if myTank.IsDead then [...] end - Kill: Removes the actor from the world, counting it as a death.
myActor.Kill() - Location: The actor's location as a CPos.
tankLocation = myTank.Location - Owner: The player that owns this actor (so long as the player is defined in WorldLoaded).
myTank.Owner = humanPlayer - Move: Move the actor to a specific location.
myActor.Move(CPos.New(45, 54)) - Type: The actor's type (or ID for our purposes).
actorType = myActor.Type - UnloadPassengers: Tells a transport to unload its passengers. Of course, this requires that the actor in question is a transport.
myTransport.UnloadPassengers()
This is only scratching the surface when it comes to using actors. There is a lot more to them that can only really be learned by reading the OpenRA doc and learning through experience. The map editor can help in some ways with figuring out what you want your actor to do. That said, there are ways to make using actors a lot better, and we're going to talk about one of those ways.
Triggers
We're now going to look at another integral part of scripts: triggers! Triggers are events that occur when a condition is met, such as when an actor is removed from the world or when a certain area of the map is entered. This is used regualrly in OpenRA maps due to some events requiring them, and they are pretty essential to the operations of a singleplayer campaign map.
Using triggers is pretty simple. You need to use the word Trigger then follow it up woth the name of the trigger you want to use, then in parentheses any actors or players that are involved as well as the function that runs when the trigger is set off. An example of a peoperly-formatted trigger is:
Trigger.OnKilled(myFactory, function (_, killer)killer.Move(mainBase.Location)end
(Note: the _ in the first spot means to ignore that parameter. The function has two parameters but we're only using the one.)
According to the OpenRA Doc, the function that runs is called the callback function, and it's called with a specific set of parameters that relate to the trigger (for example, which actors were involved). Whatever we want to do after the triggers fires goes in it.
Some triggers, such as proximity triggers, return an integer that acts as a trigger ID. We then use a separate remove function to remove the trigger when it's no longer needed. For example:
Trigger.OnEnteredProximityTrigger(chronosphere.CenterPosition, WDist.New(3 * 1024), function (a, id)Trigger.RemoveProximityTrigger(id)--// other bits of code //--end)
I would highly encourage you to read through the OpenRA Lua Doc to get a better understanding of the triggers and how they work, and as always, experience is everything, so try out a few and see what they do. Here's a few that I've used regularly and that are frequent in campaign maps:
- AfterDelay: Fires after a specifc delay in time (measured in ticks). This function makes use of
DateTime, an OpenRA library that keeps track of time and has several functions related to time and dates.Trigger.AfterDelay(DateTime.Seconds(30), function() [...] end) - OnAllKilled: Fires when the specified list of actors are killed in some way (except for being manually removed by
Destroy).Trigger.OnAllKilled(playerActors, function () [...] end) - OnAnyKilled: Similar to the above, except that it fires when any of the actors is killed.
Trigger.OnAnyKilled(playerActors, function () [...] end) - OnCapture: Fires when the specified actor is captured.
Trigger.OnCapture(myFactory, function (self, captor, oldOwner, newOwner) [...] end) - OnEnteredFootprint: Fires when an actor has entered a "footprint," a list of cell positions that surround an actor.
Trigger.OnEnteredFootprint(myWaypoint.ExpandFootPrint(), function (a, id) [...] end) - OnEnteredProximityTrigger: Fires when an actor comes within a specific range of another actor. The measurement of how close the actor is is called
WDist, which is similar in concept toWPos.Trigger.OnEnteredProximityTrigger(myActor.CenterPosition, WDist.New(7 * 1024), function (a, id) [...] end) - OnIdle: Literally my favorite trigger XD; Checks if the actor is idle, and if so, fires.
Trigger.OnIdle(myActor, function (self) [...] end) - OnKilled: Fires when this actor has been killed (other than being removed from the world manually).
Trigger.OnKilled(myActor, function (self, killed) [...] end) - OnKilledOrCaptured: Similar to the above, but also cam fire if the actor is captured instead. I don't know if this works anymore but it's worth trying out.
Trigger.OnKilledOrCaptured(myActor, function() [...] end) - OnRemovedFromWorld: Fires when this actor is removed from the world in any capacity (including being manually removed by
Destroy).Trigger.OnRemovedFromWorld(myActor, function (self) [...] end) - OnTimerExpired: Fires when the map's timer has expired. Requires that the timer is set beforehand.
Trigger.OnTimerExpired(function () [...] end)
There are a lot more than this, but they are rarely used as far as I can tell. Best to try them out yourself if you want to figure out how they work. Triggers take some getting used to but are essential for creating great maps.
Sound Controls and Text Displays
Now we move on to some less important things. I'll keep things brief here since we're already deep into the tutorial and most of the essentials were already covered. We'll start with sound and display controls, which are mostly done with the Media library. It basically allows you to play sounds and display text in certain areas that OpenRA and the mod you're using allows.
Similar to triggers, you use the Media by adding it, then choosing which function you want to run, then any parameters it takes. Here's an example:
Media.PlaySound("mysound")
Most of these take strings as its input to find the file it's looking for (in the case of sound anyway), so it's best to know beforehand what the IDs of the sound files you're looking for are. You can find these in your mod's main directory under mods -> [modname] -> audio.
Let's go over the few basic functions you might want to use:
- DisplayMessage: Displays a text message in the bottom text box. You can define its color and prefix if you want (default prefix is
Mission.Media.DisplayMessage("lotsa stuff to put here!", "Message", HSLColor.Red) - PlayMusic: Plays a music file, so long as it's defined in your mod's music file.
Media.PlayMusic("radio2") - PlaySound: Plays a sound file. Again, make sure you can find it first.
Media.PlaySound("explosion2") - PlaySpeechNotification: Plays a speech file.
Media.PlaySpeechNotification("LowPower")
Productions Controls and Queues
Admittedly, I'm not that familiar with this section, so I'm kind of going in blind here, but I think I know enough about it not that I can give a brief explanation of how OpenRA's production works. The way OpenRA does its production for buildings, vehicles, etc differs depending on a few things, so let's look into those.
I'll start by explaining OpenRA's production queues. There are two general types of queues that we need to know for scripting:
- Single-Queue: One queue for each unit/structure type; production time increases for each queue depending on how many of that structure is deployed. Queueing is dependent on the player.
- Multi-Queue: Every production structure deployed gets its own queue; Queueing is dependent on the actor and there are no multipliers.
(There is a derivation called Multi-Queue Scaled, but it bears a lot of similarities to standard multi-queue and thus isn't worth talking about here.)
Production in Lua is done with the Build function, and depending on the type of production queue, it is attached to either a player or an actor. Examples of both are below:
- Player (Single-Queue):
playerName.Build(taskForce, function(tf) [...] end) - Actor (Multi-Queue):
actorName.Build(taskForce, function(tf) [...] end)
The callback function is optional, but recommended to give the taskforce something to do after they're done being produced. Otherwise, you can give them orders outside of the Build command once the task force is ready.
It can be hard to tell which production queueing method a mod uses primarily, but the best example is the two most popular mods that come with OpenRA as standard: Tiberian Dawn and Red Alert. Here's the biggest difference:
- Tiberian Dawn: Relies on multi-queue production and thus each factory gets a production queue.
- Red Alert: Relies on single-queue production primarily and thus each player gets one production queue for each building/unit type.
A glance at some of the scripts in each of these mods shows this difference in action:
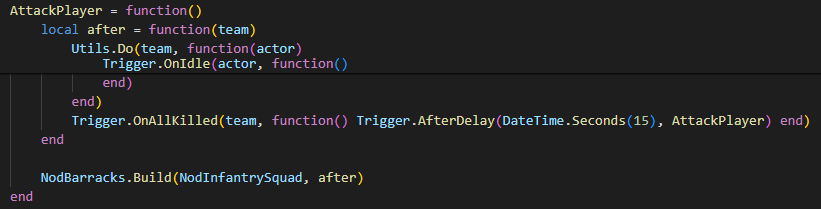
Top: Snippet from gdi03.lua, the script for the third GDI mission in the TD mod.
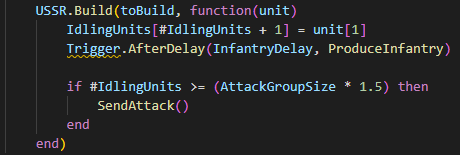
Bottom: Snippet from allies02.lua, the script from the second Allies mission in the RA mod.
In the case of the TD script, we can see that the Build command is attached to an actor (in this case, a Nod barracks), meaning that the queue is attached to the building. In the RA map, it's attached to the map's AI player (USSR) and thus the queue comes from the player instead of the factory. This demonstrates the different between a mod that handles single-queue production and multi-queue production.
We'll get more into production in the Advanced Tips and Tricks section, especially when we cover some other functions of OpenRA's Lua. For now, hopefully you have a surface-level understanding of it now.
Miscellaneous Information
Now for some other bits of information that you'll want to know in order to understand the basics. Most of this is pulled from the OpenRA Lua, so go check that out for more information.
Let's start by circling back around to DateTime, which was touched on briefly when we were talking about triggers. DateTime is an OpenRA Library that keeps track of gaem time and has several values and functions that are useful for time-related events. I would say if you have a defense mission or want to use time to dictate the flow of events, you should use this library heavily for that.
Note that game time is kept track of using ticks rather than seconds or minutes. A tick basically equates to one frame of gameplay in OpenRA, and from what I can tell, a second basically equates to 30-60 game ticks in normal gameplay. The good news is that DateTime allows you to convert seconds and minutes of time into game ticks, allowing that amount of time to pass in-game. Make sure you use those instead of regular numbers, because otherwise the pacing of the map will be way too fast.
Here are the DateTime functions you'll want to know:
- GameTime: The total game time (in ticks).
totalTime = DateTime.GameTime - Minutes: Takes a number of minutes and converts it into game ticks.
Trigger.AfterDelay(DateTime.Minutes(4), function() [...] end) - Seconds: Takes a number of seconds and converts it into game ticks.
Trigger.AfterDelay(DateTime.Seconds(20), function() [...] end) - TimeLimit: Allows you to set or get the time limit of the map. Once set, it immediately starts counting down until it hits 0.
DateTime.TimeLimit = DateTime.Minutes(4) + DateTime.Seconds(20)
Now let's also circle back to Reinforcements. I touched on this too back during the Actors section, but I also wanted to talk more about it since both of its functions can play a vital role in the flow of the map. We'll first talk about Reinforce. Like I said before, the way you use the function is:
mySquad = Reinforcements.Reinforce(myPlayer, taskForce, entryPath, 0)
Both the task force and entry path are lists, with one being a list of actor types and another being a list of waypoints that represent a path of entry, and the numebr is the delay (in ticks) between when one unit spawns and when the next unit does. The first waypoing in the entry path is the task force's spawn point.
The reinforcement can also have an associated function with it:
mySquad = Reinforcements.Reinforce(myPlayer, taskForce, 0, function(tf) [...] end)
You should have one associated with the task force to make the map more fun to play, especially for AI task forces to allow them to attack the player or something of that nature.
There is also a companion function called ReinforceWithTransport. While similar, this function is a great departure from the standard reinforcement function because of the introduction of a transporter. It's usually written like this:
mySquad = Reinforcements.ReinforceWithTransport(myPlayer, transport, taskForce, entryPath, exitPath, function(t, tf) [...] end, function(t) [...] end)
Because of the complications added with the transport, there is now an exit path along with an entry path as well as an exit function, both of which are specifically tailored to controlling the transport. If you want to add an exit function but not use an exit path, you can use nil in place of an exit path so that the script will ignore it.
I would recommend the second one especially for beach landings, but bear in mind that it takes a lot of tinkering to get right. If not done well, it will make the transport just disappear with its cargo instead of land and unload. Best to leave the actionFunc and exitFunc alone if they end up causing you trouble.
The last thing I want to talk about in this section is the Camera library. I'll keep this one brief: This essentially lets you control the player camera, and it has a single function: Position. This is essentiallty a WPos that controls the camera's X and Y position as well as its height (Z). its usage is simple:
Camera.Position = WPos.New(64, 64, 0)
If you get annoyed by the player camera starting in the very center of the map, this is a great one to remember. One solution is to move the camera to a waypoint or some other actor at the very beginning of the game, like so:
Camera.Position = camSpawn.CenterPosition
With that, we've covered essentially all the basics of Lua scripting! We are now well-equipped to make our very own mission scripts and campaigns for the mods we love! I would encourage you at this point to go to your favorite mod and do some exploration - see all of the actor types you can mess with and read through some OpenRA mission scripts to get a better understanding of how they work and apply them to your own maps. Some great resources I can recommend are the OpenRA Github and, of course, the OpenRA Lua Doc, but you can also check out the OpenRA Discord and Resource Center for more inspiration and information.
Or, just stick to this tutorial, as the next chapter is going to go into the process of making an OpenRA script from start to finish! You can check it out with the link at the top or by clicking here.
Good luck with your scripting!